Fire Lighting: A Practical Guide to Starting and Maintaining Fire
Fire is the oldest survival tool and the most important. It provides warmth, light, a way to purify water, the ability to cook food, a psychological boost that is difficult to overstate, and a signalling capability. In any emergency situation, the ability to make fire reliably separates a survivable situation from a desperate one.
The principle of fire lighting is simple: bring a fuel source to ignition temperature and maintain the conditions for combustion. What makes it complex in practice is that fuel, ignition source, and conditions are almost never ideal when you need them. This guide covers the full range of fire lighting methods from the simplest to the more involved, and the practical skill of maintaining a fire once you have it.
The Three Elements of Fire
Before any method: understand what fire needs. All three must be present in the right proportions for a fire to start and stay lit:
- Heat — Enough energy to raise the fuel to ignition temperature
- Fuel — Something that will burn: tinder, kindling, and progressively larger fuel
- Oxygen — Combustion requires air. A fire that is smothered goes out. A fire that has too much air blown at it blows out
The skill of fire lighting is managing the relationship between these three. Different ignition sources provide heat. Different fuels catch and maintain fire. Your technique in arranging them determines success or failure.
Ignition Sources: From Simplest to Most Involved
Matches and Disposable Lighters
The simplest ignition sources are also the most reliable for general use. A disposable butane lighter and a box of matches should be part of any emergency kit, full stop.
Matches are slow to light individually but extremely reliable in storage. A waterproof match (e.g. Stormmatch or similar coated match) will light even when wet and exposed to wind. Keep a box in a waterproof container in your kit. Striking surface matters — the side of the matchbox works, but a dedicated rough striker on a ferrocerium rod or even a rough stone is more reliable in cold or wet conditions.
Disposable butane lighters are the most convenient ignition source available. They work instantly, produce a flame you can direct, and are cheap enough to stock in quantity. Keep several in different locations: one in the house, one in a vehicle, one in an outdoor kit.
Limitations in cold weather: Butane gas loses pressure as temperature drops. Below roughly 0°C, a standard disposable lighter may produce only a weak flame or none at all. Below –10°C it becomes unreliable. The fix is simple: warm the lighter against your body — in a pocket, under a layer, pressed against your skin. Body heat is sufficient to restore enough pressure for the gas to vapourise and ignite. This takes a few minutes but works. Do not use a lighter that has been frozen and then warmed rapidly close to a flame — the mechanical parts may be compromised.
Ferrocerium Rods and Fire Steels
A ferrocerium rod (often called by the brand name ‘Ferro-Tech’ or ‘Blastmatch’) is a man-made alloy that produces a shower of hot sparks when scraped with a hardened steel striker. Sparks can reach 3,000°C — far hotter than a match or lighter flame. They work in any weather, including rain, wind, and freezing temperatures. They are not affected by cold because they are not pressurised gas. They are not consumable in the way matches are — a ferrocerium rod will produce thousands of sparks before the rod itself is significantly worn.
How to use:
- Hold the rod steady in one hand, or brace it against a flat surface
- Hold your striker (a hardened steel edge — the back of a knife blade, a专用 scraper, or even the spine of a hacksaw blade) at a shallow angle against the rod
- Push firmly downward in a fast, confident stroke — the sparks should shower onto your tinder bundle below
- The sparks are brief but very hot. You need dry, fine tinder in exactly the right position to catch them
The critical difference between a ferrocerium rod and a match or lighter is that the rod produces sparks, not a flame. A spark is a point source of intense heat for a fraction of a second. This will ignite dry tinder but nothing damp or thick. The quality and dryness of your tinder matters more with a ferro rod than with a flame-based ignition source.
Choosing a rod: Bigger rods produce more and hotter sparks and are easier to use. A minimum useful size is 4mm thick by 75mm long. Anything smaller is difficult to hold and produces fewer sparks. Budget around £15–£25 for a decent rod. Check before you buy: the rod should be greyish-metallic, not rusty brown. Replace when worn down to less than a few millimetres thick.
Traditional Flint and Steel
The original fire steel — a piece of high-carbon steel struck against a piece of flint or quartz — produces sparks through mechanical percussion, not chemical reaction. It works in any weather, has no moving parts, no pressure vessel, and no expiry date. It requires practice to use reliably, but it is a genuine skill worth developing.
The steel: Must be high-carbon steel (a railway spike, a scythe blade, a hard file, the back of a good quality knife). Soft stainless steel will not produce sparks reliably. The striker should have a sharp 90-degree edge.
The flint: Any hard, sharp-edged stone with silica content. Flint is the traditional choice but quartz, jasper, agate, or any hard, glassy stone will work. The principle is the same: a sharp edge of steel is struck against the sharp edge of stone, and the impact knocks off tiny particles of steel that oxidise (burn) in the air, producing sparks.
The technique: The steel is held in one hand, the flint in the other. The flint is held above the steel with the sharp edge facing down. The striker is brought down firmly against the flint edge, creating a shower of sparks downward onto the tinder. The stroke must be confident and firm — a tentative scrape produces nothing.
Flint and steel produces sparks less consistently than a ferrocerium rod, but it is a more satisfying and maintainable skill. With practice you can light a fire in under a minute from cold.
Magnifying Lens
In bright, direct sunlight, a convex lens will focus the sun’s energy onto a single point, producing enough heat to ignite dry tinder. This is a genuine method, not a theoretical one. It requires clear, direct sunlight and is essentially useless in overcast conditions or in winter in the UK. It is included here because it is free, requires no equipment beyond what you may already carry (spectacles, a magnifying glass, or any convex lens), and works when nothing else is available.
Method: Hold the lens between the sun and your tinder. Move the lens until the focused spot of light is a tiny, sharp circle — this is the point of maximum intensity. Hold it steady. The tinder will begin to glow and smoulder within seconds if it is dry enough. Blow gently to encourage a flame.
What works: spectacles (particularly reading glasses), a magnifying glass, a camera lens, a binocular lens, a telescope lens, a water bottle filled with clear water (curved surfaces can focus sunlight). The smaller and more curved the lens, the better the focus.
This is not a primary fire lighting method in the UK given our climate, but it is worth knowing. A pair of reading glasses in a survival kit costs nothing and weighs nothing.
The Tinder Hierarchy
No ignition source works without the right tinder. Tinder is the material that catches the first spark or flame and begins to burn, providing the heat to ignite the next stage. The key quality of good tinder is surface area relative to mass — the finer and drier the material, the more easily it ignites.
Reliable Tinder Sources
- Charcloth — cloth that has been heated in a closed container until it is fully charred but not burned to ash. It catches a spark readily and glows steadily, making it excellent for transferring fire to kindling. See making charcloth below.
- Dryer lint — thecollected fluff from a clothes dryer is highly flammable and catches sparks well. Keep a small sealed container of it in your kit.
- Birch bark — the papery outer bark of birch trees contains natural oils and ignites even when slightly damp. Peel downward to get the fine inner layers.
- Cedar bark — thin, fibrous inner bark of cedar and similar conifers works well
- Cotton balls — plain cotton balls from a pharmacy catch sparks and flame readily. Pull them apart to increase surface area. Impregnate with petroleum jelly for an even better, longer-burning tinder.
- Fatwood — the resin-soaked heartwood of pine and other conifer stumps. Resin burns at very low moisture content and even when slightly damp. If you find a dead pine stump, split it — the interior is often saturated with resin and will ignite from a spark even in damp conditions.
- Dry grass, dead leaves, moss — fine, dry material catches sparks. Moss less reliably than grass or leaves. Collect from off the ground and from a sunny, dry location where possible.
- Newspaper, cardboard, paper — torn into fine strips and crumpled. Not waterproof; only useful in dry conditions.
- Steel wool — fine steel wool catches sparks and burns. It also conducts electricity — see the battery method below. Fine (0000 grade) steel wool is best.
Making Charcloth
Charcloth is simply cloth that has been heated in a closed container until the volatile compounds have been driven off, leaving a brittle, black carbonised material that catches sparks readily and glows steadily. It is the single most useful prepared tinder you can make and keep in an emergency kit.
Method — the sealed tin technique:
- Take a small metal tin with a lid — an empty coffee tin, a metal tobacco tin, or similar. A small hole (about 5mm) must be punched or drilled in the lid.
- Cut cotton cloth (cotton t-shirt material, cotton handkerchief, or similar) into pieces small enough to fit flat inside the tin without folding excessively.
- Place the cloth inside the tin and put the lid on firmly. The hole must remain open.
- Place the tin in a fire. On top of a wood stove, in the embers of a campfire, or on a platform over a fire. The hole allows volatile gases to escape as the cloth chars. If the lid is sealed completely, pressure builds and the tin will burst or explode. Point the hole away from yourself and others.
- Heat for 20–40 minutes. The cloth inside will turn black and brittle. Remove from heat and allow to cool completely before opening.
- If the cloth turns to white ash, the tin was too hot or left too long. If it is unchanged, it was not hot enough. With practice you will learn the right timing.
- Store charcloth in a sealed, waterproof container. It lasts indefinitely when kept dry.
The charcloth produced in this process can be reused several times — when it has burned away to nothing, it has done its job. Carry several pieces in a small waterproof container in your kit.
Emergency Fire: Battery and Wire Wool
This method uses a short electrical circuit to heat a fine conductor to ignition temperature. It works with any battery that can deliver enough current: AA, AAA, C, D, and 9V batteries all work. It requires wire wool (fine steel wool, available from hardware shops) or fine wire.
The principle: When you connect the two terminals of a battery with a conductive material that has low mass (a thin wire or steel wool), the electrical resistance in the conductor causes it to heat up rapidly. Fine steel wool heats to glowing in a matter of seconds when connected across a battery’s terminals. If the steel wool is touching dry tinder, it will ignite it.
Method:
- Pull a strand or a small bundle of fine steel wool apart gently — you want it fluffy and loose, not compressed
- Place the steel wool directly against your tinder bundle (charcloth, cotton, dry grass, etc.)
- Touch the positive and negative terminals of the battery to opposite ends of the steel wool simultaneously
- You will see the steel wool begin to glow red and then spark. This takes 3–10 seconds depending on the battery strength
- As soon as you see sparks or a glow, remove the battery and gently blow on the glowing steel wool to encourage the tinder to catch
Notes:
- Dry tinder is essential. This method produces a brief, localised heat source. Damp tinder will not ignite.
- A 9V battery is the most reliable for this method — it delivers enough current with relatively low internal resistance. AA and AAA batteries work but the effect is less dramatic; C and D cells work better.
- Use fresh batteries. Flat batteries produce no heat.
- The battery will be drained quickly once the circuit is connected. Do not maintain the connection for longer than necessary.
- Fine steel wool is also excellent tinder in its own right — a spark from a ferrocerium rod will ignite it directly.
Friction Methods: The Bow Drill
Friction fire lighting — most commonly the bow drill — is the classic survival skill. It works. It is also demanding. Anyone who tells you it is easy either learned in ideal conditions with good materials or is exaggerating. In practice it requires significant skill, the right materials, and considerable physical effort.
The bow drill system has five components:
- The fireboard — a softwood plank, typically 20–30cm long and about 1.5cm thick. The bottom of the drill socket is pressed against the board and the drill is rolled between the palms as the bow is drawn back and forth.
- The drill — a straight, rounded stick about 20–40cm long and roughly 2cm in diameter, pointed at both ends. The bottom point sits in the depression in the fireboard. The top point sits in a socket (see below). The drill must be of a soft, dry wood — willow, poplar, basswood, or similar.
- The socket — a shaped piece of hardwood or another material that holds the top of the drill in place. It should be held in the non-dominant hand pressed firmly on top of the drill. The socket must be smooth where it contacts the drill to reduce friction.
- The bow — a slightly bent branch about arm’s length, with cord strung tautly between the ends. The cord wraps around the drill once. As you move the bow back and forth, the drill rolls.
- The bearing block / socket — the top of the system. Some sockets are carved with a depression for the drill; others use a smooth stone or other material.
The technique:
The bow is held in the dominant hand. The fireboard is placed on the ground, held steady with a foot or knee. The socket is held in the non-dominant hand atop the drill, which rests in the notch on the fireboard. The bow cord is wrapped once around the drill. The bow is moved back and forth in long, smooth strokes, rolling the drill rapidly. The motion is partly downwards and partly rotary — you are not just sawing but applying downward pressure while rotating the drill.
The action produces heat at the interface between the drill and the fireboard, particularly in the notch. With practice, this heat builds to create an coal (a glowing ember) in the dust created by the friction. This coal is then carefully transferred to a tinder bundle and blown to a flame.
What makes it difficult:
- Wood choice is critical. The fireboard and drill must be of the right softness and dryness. Most failures come from using the wrong wood. Willow, poplar, basswood, alder, and cottonwood are good choices in the UK.
- The spindle (drill) must be the right diameter relative to the bow and the operator’s reach. Too thick and the bow cannot turn it fast enough. Too thin and it flexes and burns out before heat builds.
- Technique matters: too little downward pressure and the drill slips. Too much and you stall the rotation. The correct pressure comes with practice.
- A consistent rhythm is required. Stop-start action does not build heat.
- Physical condition matters. This is aerobic exercise. In cold conditions, when you most need fire, you are already depleted of calories and warmth. The bow drill consumes significant energy.
Realistic expectation: In favourable conditions with good materials and a well-made set, a practiced operator can produce a coal in 30–60 seconds. A beginner using this method for the first time should expect to spend 10–20 minutes of sustained effort, if they succeed at all. This is not a criticism of the method — it is genuinely difficult — but an honest assessment of what to expect. It is a skill that requires deliberate practice in non-emergency conditions.
For emergency preparedness: learn this method as a fallback skill, but invest your primary practice time in the easier methods above. A lighter and good tinder will serve you better in 99% of real situations than a bow drill.
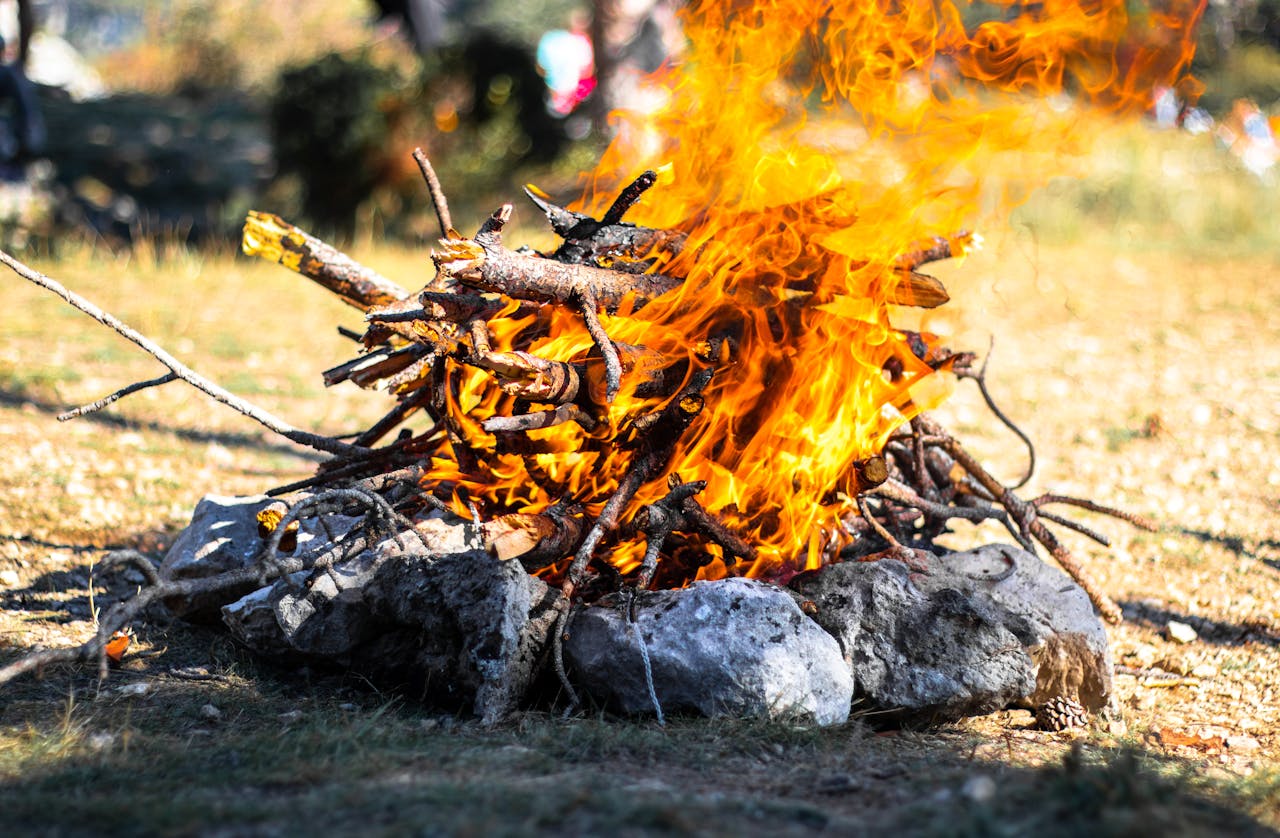
Maintaining a Fire and the Charcoal Principle
Starting a fire is one skill. Keeping it going is another. The most overlooked aspect of fire management is what happens when a fire dies down and what you can do with the remnants.
Building a Sustainable Fire
The instinct of a beginner is to pile on as much fuel as possible. This usually smothers the fire. The correct approach is to add fuel gradually, creating progressively larger flames as the fire establishes itself.
- Start with your tinder and kindling. Small, thin, dry material catches flame first.
- Add kindling slightly thicker than matches as the tinder catches. Build a small inverted pyramid (a ‘log cabin’ structure) around the initial flame, leaving gaps for air.
- Add progressively larger fuel as the kindling catches. Let each stage establish before adding more.
- A fire needs air. Leave gaps in the structure. Do not completely enclose the flames.
- Once you have a good flame established, add fuel to maintain the heat. The goal is steady combustion, not a single large blaze.
The Charcoal Principle
This is one of the most practically useful pieces of knowledge in fire management, and it is almost never mentioned in fire lighting guides.
When a fire burns down to embers in a bed of charcoal, those embers retain heat for a long time — hours, sometimes many hours, depending on the conditions. If the embers are from dense, slow-burning wood (oak, ash, hawthorn, beech), and if they are sheltered from wind and rain, they can be revived to flame by the simple act of blowing.
The principle:
- Allow the fire to burn down to a hot ember bed. Do not let it go completely to ash — the goal is glowing charcoal, not cold ash.
- Push the embers together into a compact pile. If they are spread out, heat dissipates.
- If the embers are exposed, shield them from wind and rain. Even a cupped hand or a piece of bark as a shield helps.
- Blow gently and steadily onto the glowing embers. Your breath provides additional oxygen. The fine surface of the charcoal will reignite.
- This works best with dense hardwood charcoal. Softwood burns faster and produces less enduring embers.
Why this matters: In a survival situation, maintaining a fire through the night without constant attention is important. A fire that is allowed to burn down to a protected ember bed can be revived in seconds with a breath. A stirred ember that has been kept dry will often reignite with less effort than it took to light the original fire.
If you wake in the night and the fire has died to embers, do not assume it is finished. Blow on the embers. You may be able to revive flame without any ignition source at all.
Fire Discipline
A fire also creates risk. In any survival situation, consider:
- Site selection: Away from overhanging branches, dry grass, or flammable materials. A clear area of earth or mineral soil is ideal. In dry conditions, a fire on dry grass will spread.
- Wind direction: A change in wind can blow sparks onto flammable material some distance from the fire. Be aware of what is downwind.
- Water source: Keep water or wet material to hand to extinguish the fire when you leave. A fire that is left burning and escapes is a catastrophe.
- Extinguishing: drown the fire with water, stir the ashes, drown again. A fire is not out until the ashes are cool to the touch. If you cannot do this, do not light the fire in the first place.
Fire Lighting: The Full Sequence
For any ignition method, the sequence is the same:
- Prepare your fire site first. Clear ground, arrange stones if using, have fuel ready in order of size.
- Prepare your tinder bundle. Have it ready before you start the ignition. Ignite the tinder.
- Nurse the flame. Shield it from wind. Position it so it catches fully before you add kindling.
- Build up progressively. Kindling first, then larger fuel. Do not rush this stage.
- Establish the fire. Get it burning steadily before you attend to anything else.
- Maintain intelligently. Feed fuel as needed. Allow ember beds to form for overnight retention.
What to Carry in Your Emergency Kit
- Two or three disposable butane lighters (one is not enough)
- A box of stormproof matches in a waterproof container
- A ferrocerium rod with hardened striker
- A small container of charcloth (make your own)
- A packet of cotton balls (tinder)
- A small roll of fine steel wool (acts as both tinder and emergency ignition via battery)
- A small pair of needle-nose pliers or tweezers (for handling hot tinder)
- A folding saw or knife (for preparing fuel)
None of this takes up much space. All of it is inexpensive. Together it means you have multiple ignition methods and the means to use them in any conditions.
Post Comment